After about 2 years and less than 4K miles, the brake master cylinder has started to… break. Locking front brakes. No return of fluid causing the front brakes to stick tight and overheat the pads and rotors.
Bench bleeding the new Dorman M39042 brake master cylinder
I had a bear of a time finding the correct replacement master cylinder. I contacted the vendor I purchased it from, Auto City Classic. Of course it’s not under warranty and I didn’t expect it to be. I emailed and did not get a response, so I called. I got the answer of the master cylinder being from a 1972 Corvette. I had to order one since no one had one in stock. Then I got an email response… A 1978 Corvette… So which is it? I soon found out that the 1972 Corvette master cylinder was NOT the correct replacement. 1978 it was. Not a bad price, but took a few tries to get there, including two others.
Dorman M39052 – 1978 Corvette. Perfect fit. Done.
New Dorman M39042 brake master cylinder installed. Ready to bleed the brake lines.
The sticking disc brakes cause some light glazing on the new rotors I just installed a few weeks ago, and of course messed up the brake pads. The last brake change, I put on ceramic semi-metallic pads which I don’t like. I wanted organic ceramic so I took this chance to change them out.
I had no idea how old the calipers were. They seemed to be in good condition, but suddenly a brake bleeder was stuck. New calipers were only $22 each, so… new calipers also.
Existing calipers seemed in good condition, but of unknown age.
Before the brakes were an issue, I decided I would change out the 3″ drop coil springs for stock springs and drop spindles for a better ride. The drop coils caused me to “bottom out” a few times, experiencing the rubber bump stops way too often.
After some questions in my favorite C10 FB group, further research on the forums and a good ol’ fashioned measuring tape, I realized I would be best off with 2.5″ drop spindles along with the stock coils, because otherwise the lower ball joints would rub the wheel. So what if I was 3″ drop before and now will be only 2.5″ drop. What’s a half-inch amongst friends? On a very positive note, I found the Chassis-Tech spindles on sale on Ebay for a very good price of $175. Immediately after purchase, they raised the price to $240! It just may be that someone listed them at the incorrect price, but that’s how much I paid!
Note that there are two different size spindles available for C10s. Those to fit 1.25″ thick rotors with heavy-duty brakes like I use and those to fit 1″ thick rotors for standard brakes. Different inner wheel bearings are used for each also. Verify which rotors you are using before you purchase.
New Chassis-Tech SPI-GM7387A 2.5″ drop spindles
New Chassis-Tech SPI-GM7387A 2.5″ drop spindles installed
Stock springs were challenging. What stock springs? ’66 or ’85 (square body), which I think most of the front suspension is. I chose square body springs. ACDelco 45H0075 (3155 lb load rate).
ACDelco 45H0075 OEM replacement front coil springs
With all this happening, I decided to go ahead and replace the lower ball joints also. The uppers were changed previously, just after I got the truck road worthy. In doing this, I also discovered that one lower control arm shaft was worn. So, let’s change them also. Whew! I think that’s all the new parts.
All of this went together without much problem. I changed the press-in ball joints while I had the lower A-arm off for the shaft. Much easier to do in a vice on the bench in my opinion.
Lower control arm on the bench for ball joint and shaft replacement
Putting everything back together was pretty simple also. I didn’t even need to use the rented coil spring compressor tool.
Success! All back together and looking great.
When I lowered the truck back down off my QuickJack BL7000EXT, something looked odd. A quick measurement showed me I was 3″ higher ride height than when I started… I expected 1/2″ higher. 3″ drop coil to 2.5″ drop spindle should be 1/2″, right. Not so. I surmise the stock coil springs are a little “beefier” than I expected…
QuickJack BL7000EXT
Not to worry. Time to cut the coil springs. Which I hated doing, because they are the reason I wanted to do the drop spindles instead anyway. Research and previous knowledge has me knowing that when cutting GM coil springs, 1″ off the coil means 2″ lower on the vehicle. 3″ to get me back where I was would be cutting 1.5″ off the coils. NOT NECESSARILY 1.5 COILS. Measure the free standing coil and measure down 1.5″ and cut. I did this a little at a time to assure I wasn’t incorrect and remove too much at once. Great! back where I expected and still much more suspension travel than before!
Section cut from replacement coil spring.
Now, I know that drop spindles will cause some interferences with the stock lower control arm. I know that this has been resolved many times, for years, by others by “simply” grinding off the offending areas on the lower A-arm. I didn’t want to ruin my control arms, so with my trusty ol’ HF angle grinder and a sanding flap disc, I removed as little material as needed. This took some trial and error and many “test runs”. I would remove a little, re-install the wheels, take a short drive and see what was rubbing where. Each time I ground off the offending areas, I added a coat of spray paint so I could see where the next area rubbed. I did this several times and finally got no wheel, balancing weight, or tire rubbing. I will change out to stick-on weights, but I know that press-on weights will now not interfere.
Unmodified original lower control arm in placeModified lower control arm by grinding away interfering area.
After all back together and a few short test drives, I think all is well. I will next head to a local “old school” alignment shop recommended by several for a much needed wheel alignment. Thanks to Riggs Frame & Alignment Services in Louisville for a quick and accurate alignment.
Completed installation of 2.5″ drop spindles and components.The best pic I have showing the latest version.
I added the front sway bar back on with correct brackets to work with the now not as low suspension.
CPP 6372LSB Front sway bar frame brackets.
I’ll continue to use the shorter bump stops I installed previously when I installed the 3″ drop coil springs. Moog K6598. Moog K6607 also fits a C10, but is taller. Not sure the specifics on why there’s a tall and short option for same year C10s. List price is MUCH higher for the K6598, but both about the same low price at the parts store. See Moog website for details.
Moog K6598Moog K6607
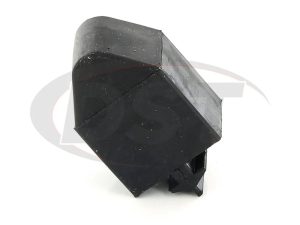
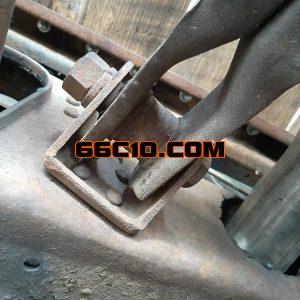
A couple weeks ago I finally got the rear control arm bushings changed out.
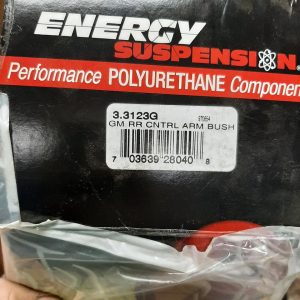
Rear control arm bushing bracketsRear control arm bushing brackets disconnected and original 1966 bushings removed.Energy Suspension replacement rear control arm bushings
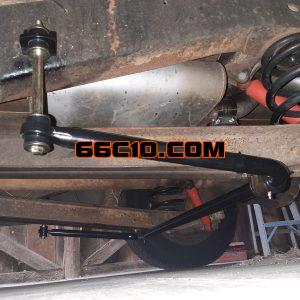
Rear sway bar from CPP is installed. It’s amazing the difference the front and rear sway bar make. Simple install with included instructions. There are great videos on Youtube from Brothers Trucks showing install of all of these suspension components.
Rear Sway Bar from CPP. CPP7401
This posts parts list:
Coil Springs – ACDelco 45H0075 Lowering Spindles – Chassis Tech SPI-GM7387A
Lower Ball Joints – K6117T
Lower Ctrl Shafts – K6147
Calipers – 184126/184127
Brake Pads – Wagner QC52
Master cylinder – Dorman M39042
Front sway bar brackets – CPP 6372LSB
Rear control arm bushings – Energy Suspension 3.3123G
Rear Sway Bar – CPP 7401